


Replacing guitar strings involves safely removing worn strings and installing new ones to improve tone and playability. The process requires specific tools, careful winding, and patience with tuning and stretching to ensure stability. Consistent, proper restringing enhances your instrument’s sound and longevity over time.
Replacing guitar strings is the process of removing worn strings and fitting a fresh set to restore your instrument’s tone, intonation, and playability. Whether you play a Fender Stratocaster, a Martin acoustic, or a Gibson Les Paul, fresh strings make a measurable difference to how your guitar sounds and feels. This guide covers every stage of the restringing process, from the tools you need to the tuning techniques that keep new strings stable. Follow these steps and you will handle the job confidently, regardless of your experience level.
What tools do you need to replace guitar strings?
The right equipment makes the process faster, safer, and better for your instrument. Essential tools include a new set of strings, a digital tuner, a string winder, and wire cutters. Experienced players complete a full restring in around seven minutes with these tools to hand. Beginners should expect to take longer, and that is perfectly fine.
Here is what to gather before you start:
- New strings: Match the gauge and type to your guitar. An acoustic guitar takes bronze or phosphor bronze strings; an electric guitar uses nickel or stainless steel. If you are unsure which gauge suits you, the Musicstreet guide on string gauge selection is a practical starting point.
- Digital or clip-on tuner: A clip-on tuner like a Snark or a D’Addario eclipse tuner gives you accurate pitch reference throughout the process.
- String winder: A peg winder speeds up the winding stage considerably and reduces hand fatigue.
- Wire cutters: Sharp cutters trim excess string cleanly without fraying.
- Soft cloth and fretboard conditioner: Lemon oil works well on rosewood and ebony boards. Avoid any liquid on maple fretboards.
| Tool | Purpose |
|---|---|
| String winder | Speeds up winding on tuning pegs |
| Wire cutters | Trims excess string safely |
| Digital tuner | Confirms accurate pitch after fitting |
| Fretboard conditioner | Cleans and conditions the board during restringing |
| Soft cloth | Removes grime from body and neck |
Pro Tip: Buy strings in bulk packs from brands like Ernie Ball, D’Addario, or Elixir. The per-set cost drops significantly, and you will always have a spare set ready when a string breaks mid-session.
How to remove old guitar strings safely
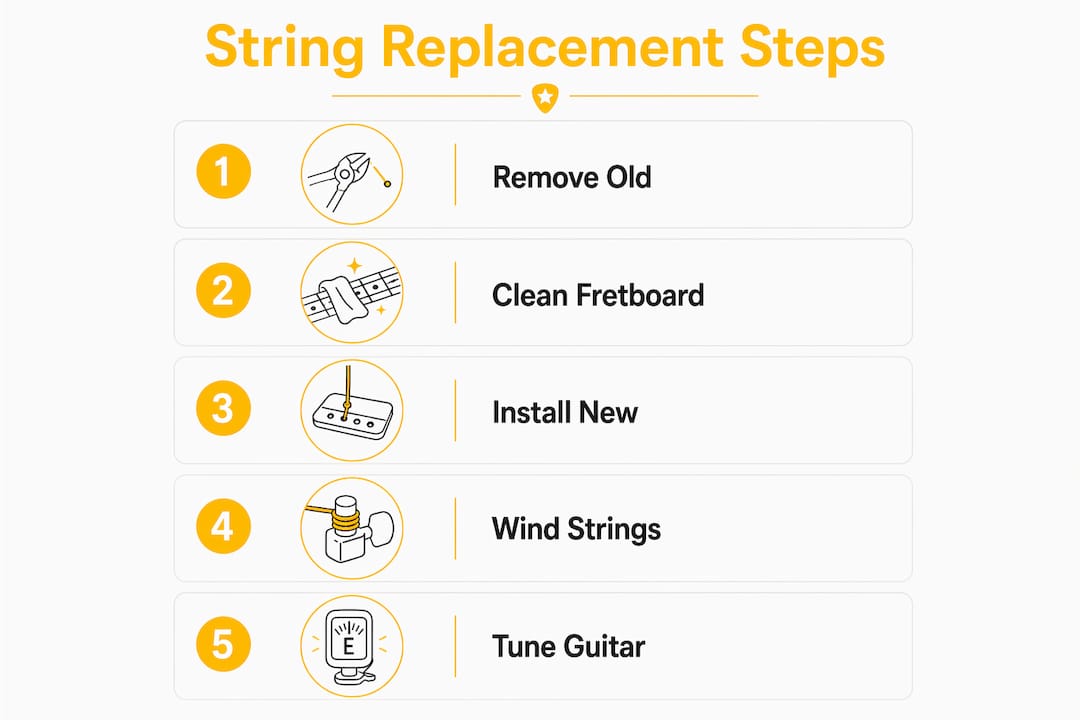
Removing strings incorrectly is where most beginners cause accidental damage or injury. The golden rule is simple: never cut a string while it is under tension. Cutting under tension risks a sharp snap that can catch your hand or eye. Always slacken the string fully at the tuning peg first, then cut.

The second key decision is whether to remove all strings at once or one at a time. For most guitars, replacing one string at a time maintains neck tension and prevents structural issues. This is especially critical on guitars with floating tremolo systems, such as a Floyd Rose, where removing all strings simultaneously causes the bridge to collapse forward. Vintage instruments with delicate setups also benefit from the one-at-a-time approach.
Follow these steps for safe removal:
- Turn the tuning peg to loosen the string until it is completely slack.
- Once slack, use wire cutters to snip the string near the soundhole or pickups.
- Unwind the remaining coil from the tuning post and pull it free.
- Remove the string from the bridge pin (acoustic) or bridge saddle (electric).
- Dispose of old strings carefully. Coil them tightly and place them in the packaging from your new set to avoid loose wire causing injury.
Replacing strings one at a time is the safest method for maintaining neck stability and protecting your guitar’s setup. This is non-negotiable on floating tremolo guitars and strongly recommended for all others.
Take this moment to inspect the tuning pegs and bridge for any wear or corrosion. A restring is the ideal time to spot small issues before they become expensive repairs.
How to install new strings correctly
Installing strings with care is what separates a guitar that holds tune from one that drifts constantly. Work from the thickest string to the thinnest, following the standard order from the 6th string (Low E) to the 1st string (High E). This sequence keeps tension balanced across the neck as you work.
- Feed the string through the bridge. On an acoustic, seat the bridge pin firmly so the ball end locks against the underside of the bridge plate. On an electric, thread the string through the tailpiece or bridge saddle.
- Pull the string up to the corresponding tuning peg. Leave enough slack to allow for winding. A useful method is to pull the string taut, then push it back toward the headstock by roughly 7 to 10 centimetres before inserting it into the peg hole.
- Bend the string at a right angle inside the peg hole to lock it in place before winding.
- Wind the string onto the post using your string winder. The wraps must spiral downward on the post. A descending spiral creates the correct break angle at the nut, which directly improves tuning stability.
- Aim for 2 to 3 wraps on thicker strings (6th, 5th, 4th) and 3 to 5 wraps on thinner strings (3rd, 2nd, 1st). Too many wraps cause slippage; too few reduce the string’s grip on the post.
- Once wound to approximate pitch, trim the excess string with wire cutters. Leave at least 0.5 centimetres of excess beyond the cut to prevent the string from slipping out of the post.
Pro Tip: While the strings are off, clean the fretboard thoroughly. Fretboard cleaning is the only time you have full access to every fret and the wood between them. A conditioned fretboard feels noticeably smoother and lasts significantly longer.
Choosing the right string for your guitar type
| Guitar type | Recommended string material | Typical gauge range |
|---|---|---|
| Acoustic | Phosphor bronze or 80/20 bronze | .011 to .053 |
| Electric | Nickel wound or pure nickel | .009 to .046 |
| Classical | Nylon (treble) and silver wound (bass) | Standard tension |
| Bass | Nickel wound or stainless steel | .045 to .105 |
Matching the string to the instrument is not optional. Fitting heavy acoustic strings to a guitar set up for lights will pull the neck forward and raise the action uncomfortably.
How to tune your guitar after changing strings
New strings detune quickly. This is normal behaviour and not a sign that something has gone wrong. New strings drop in pitch initially before stabilising, which is why tuning immediately after fitting is only the beginning of the process.
Use a digital tuner to bring each string to its correct pitch: E A D G B E from the 6th to the 1st string. Once all strings are at pitch, go back and retune from the beginning, because tightening later strings pulls earlier ones slightly sharp. Repeat this cycle two or three times until the guitar holds pitch consistently.
Pre-stretching is the most effective way to speed up this settling period. Gently pulling new strings along their length after tuning up reduces the time needed for stable tuning significantly. Grip each string at the 12th fret, pull it away from the fretboard by a centimetre or two, then retune. Do this three or four times per string.
Common mistakes to avoid during this stage:
- Overtightening: Winding a string past its correct pitch under the assumption it will drop is a reliable way to break it. Tune up to pitch gradually.
- Poor winding technique: Strings wound upward on the post or with uneven wraps will slip and detune unpredictably.
- Skipping the stretch: Players who skip pre-stretching often find their guitar is noticeably out of tune after 20 minutes of playing.
- Ignoring the nut: If a string keeps going flat at the same pitch, the nut slot may need lubricating. A small amount of graphite from a pencil applied to the slot solves this in most cases.
Pro Tip: After pre-stretching, play the guitar hard for five minutes, then retune. This simulates real playing conditions and accelerates the settling process far more effectively than gentle strumming.
Should you change all strings at once or one at a time?
This is one of the most debated questions in guitar maintenance, and the answer depends on your guitar’s construction. Full string removal risks neck tension loss and floating bridge movement, making it a poor choice for certain instruments. One-at-a-time replacement is safer for instrument integrity across the board.
| Method | Advantages | Risks |
|---|---|---|
| One at a time | Maintains neck tension; safer for floating tremolos | Slower; limits fretboard cleaning access |
| All at once | Full fretboard access for cleaning; faster for experienced players | Neck tension loss; bridge collapse risk on floating systems |
For beginners, the one-at-a-time method is the correct starting point. It protects the setup and gives you a reference point for how the guitar should feel as you work. For experienced players on fixed-bridge guitars, removing all strings at once is acceptable and gives you the opportunity to clean the guitar body and fretboard thoroughly.
When cleaning the fretboard with strings removed, use the correct product for the wood:
- Rosewood and ebony: Apply a small amount of lemon oil or a dedicated fretboard conditioner with a soft cloth. Wipe off any excess after two minutes.
- Maple: Wipe with a dry or very lightly dampened cloth only. Maple fretboards are typically lacquered and do not require conditioning.
- Pau ferro: Treat like rosewood. It responds well to light conditioning.
Fretboard health during string changes preserves instrument longevity and feel. A dry, cracked fretboard affects playability just as much as dead strings.
Key takeaways
Replacing guitar strings correctly requires the right tools, a safe removal method, precise winding technique, and patient tuning with pre-stretching to achieve lasting stability.
| Point | Details |
|---|---|
| Use the correct tools | A string winder, wire cutters, and a digital tuner make the process faster and safer. |
| Replace one string at a time | This protects neck tension and is non-negotiable on floating tremolo guitars. |
| Wind strings downward on the post | A descending spiral creates the correct break angle at the nut for tuning stability. |
| Pre-stretch new strings | Gently pulling each string after tuning up dramatically reduces tuning drift during play. |
| Clean the fretboard during restringing | This is the best opportunity to condition the wood and extend the life of your instrument. |
Why patience is the real skill in restringing
Most players who struggle with restringing are rushing. I have seen it repeatedly at Musicstreet: a guitarist fits new strings, does a single tune-up, and then wonders why the guitar is flat by the second song. The process is not difficult, but it rewards attention.
The winding stage is where most errors happen. Strings wound loosely or upward on the post look fine until you start playing, at which point they slip and the guitar drops out of tune within minutes. Taking an extra 30 seconds per string to wind neatly and downward makes a genuine difference that you will feel immediately.
My other strong recommendation is to restring more often than you think necessary. Most players wait until strings break or sound obviously dead. A better habit is to change strings every four to eight weeks if you play regularly, or before any important performance. Fresh strings on a well-maintained guitar, such as a properly set up acoustic from a trusted source, are one of the simplest upgrades available to any player. The improvement in tone and response is immediate and costs very little.
If you are new to the process, practise on a cheaper guitar first. The technique transfers directly, and the confidence you build means you will approach your better instruments without hesitation.
— Music
Find everything you need at Musicstreet

Musicstreet stocks a full range of guitar strings from leading brands including Ernie Ball, D’Addario, and Elixir, alongside the accessories you need to restring with confidence. Whether you are looking for a clip-on tuner, a string winder, or fretboard conditioner, the Musicstreet shop carries the tools that make the job straightforward. If you are also considering upgrading your instrument, browse the premium guitar collection at Musicstreet, featuring new and pre-owned guitars from Gibson, Fender, PRS, and Martin. The team at the Huntingdon store is available to advise on string selection, gauge choices, and setup, so you always leave with the right product for your playing style.
FAQ
How often should I replace my guitar strings?
Replace strings every four to eight weeks if you play regularly, or sooner if they sound dull, feel rough, or show visible corrosion. Gigging musicians often change strings before every performance.
Can I replace guitar strings without a string winder?
Yes, but the process takes considerably longer. A string winder is inexpensive and reduces winding time from several minutes to under 30 seconds per string, making it a worthwhile investment.
Why do my new strings keep going out of tune?
New strings stretch as they settle, causing pitch to drop initially. Pre-stretching each string gently after fitting and retuning several times accelerates the settling process and stabilises tuning within a single session.
Is it safe to remove all guitar strings at once?
On most fixed-bridge guitars it is acceptable, but removing all strings simultaneously on a floating tremolo guitar risks bridge collapse and neck tension loss. One-at-a-time replacement is the safer method for all guitar types.
What strings should I use on an acoustic guitar?
Acoustic guitars require bronze or phosphor bronze strings. Phosphor bronze strings, such as those made by D’Addario or Martin, offer a warmer tone and longer lifespan than standard 80/20 bronze, making them the preferred choice for most acoustic players.


Share:
What does Stratocaster mean? The definitive answer
Reverb explained: what it is and how it works